C# Hello World in detail

A more detailed look at a beginning c# Hello World application.
Introduction:
There are plenty of tutorials in c# about doing a "Hello World" application, this is likely one of the first applications that you will ever develop when learning. Creating this software covers installing the software, and the basics of how applications are set up.
What these applications don't cover is some things that are important knowledge that are not so useful starting out, but can be useful later. Is it instead handed to you, or prebuilt by the application? So this is a bit more details look at what is going on in a simple "Hello World" application.
What you will need:
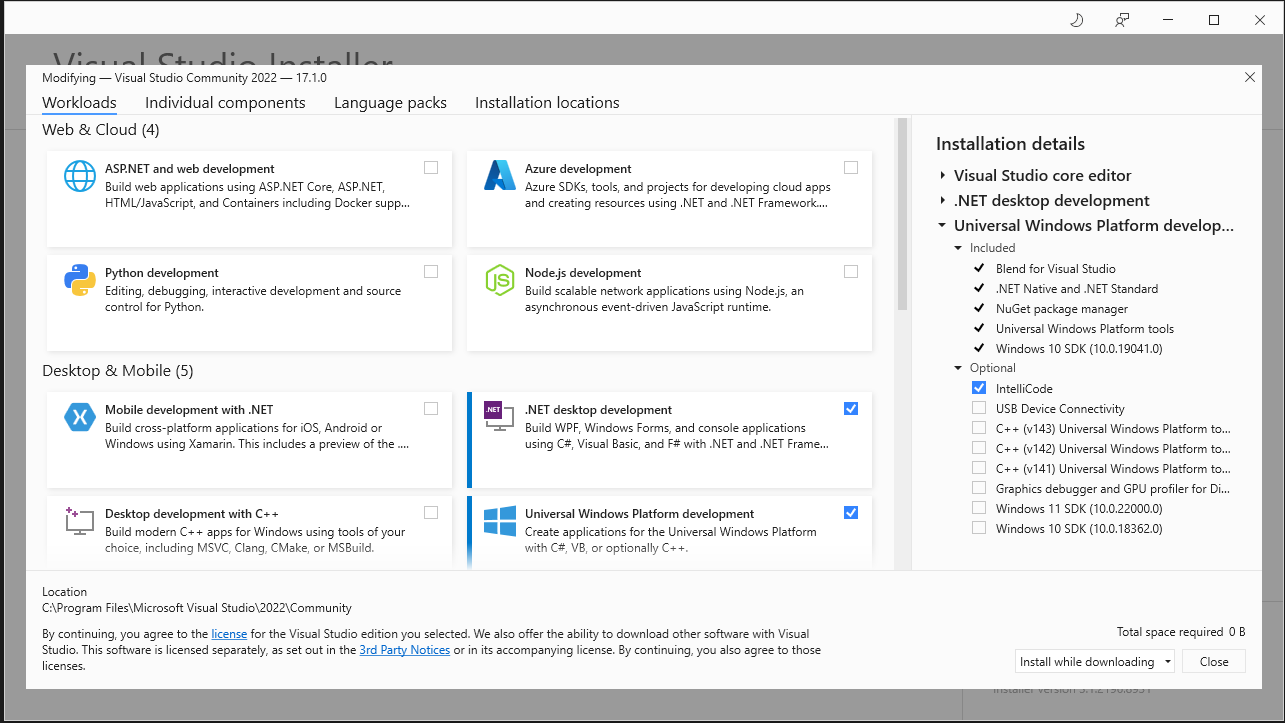
Visual Studio Community 2022 Edition Link-
This software is one of the ways that you can develop in c# code. The Community Edition is free and should work for most of the things that you would like to do. During the installation process select "Universal Windows Platform Development", and ".Net Everything else can just be clicked through, you will not need to create an account to get started.
Create a new project:
Once Visual Studio is open we will want to create a new project. In the top bar click File->New->Project...
it
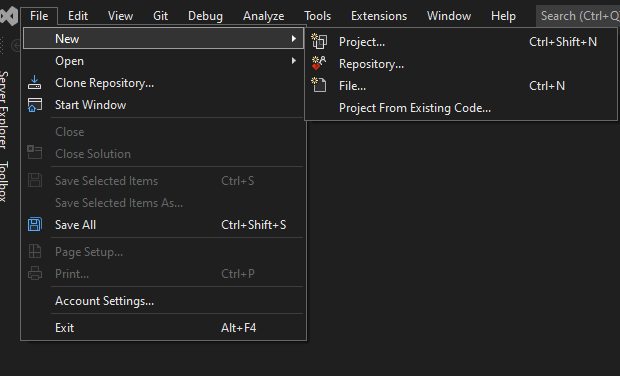
The other options presented under new are repository... which will work with an online code storage called a repository. File..., which will allow you to open files belonging to other projects, or even things like text files. Project From Existing Code... allowing you to create a new project using files that already exist.
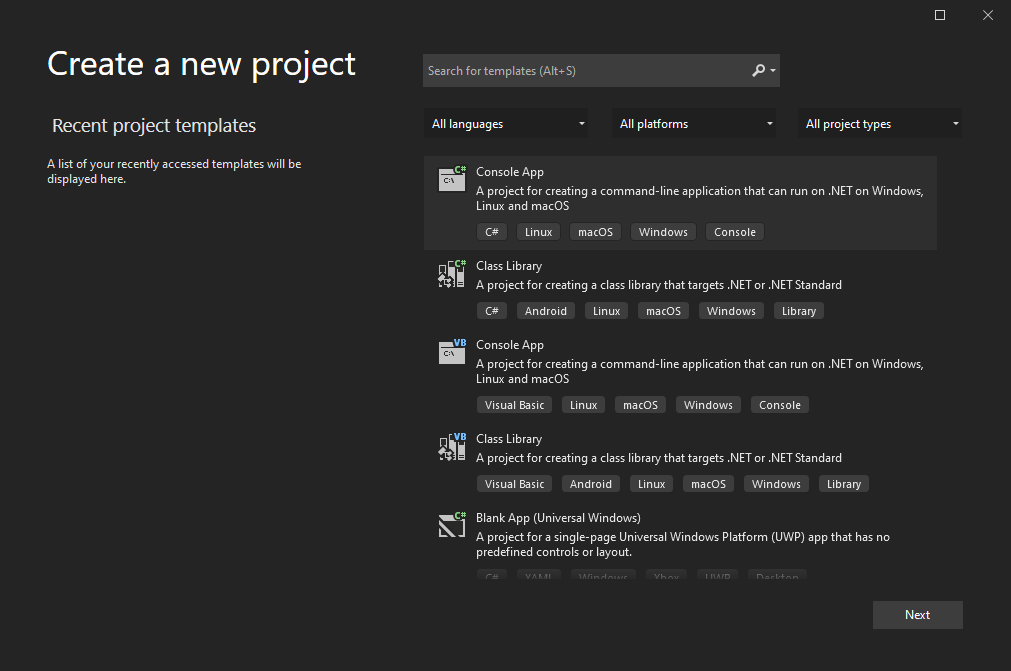
On the next screen make sure the top Console App is selected, in the top of the icon for this option will be a c#. Then click next.
The following screen has some things worth mentioning.

Project Name-
This is what your application will be called. The default end result will be HelloWorld.exe file that can then be run on a workstation.
There are limitations on some special characters and a warning will come up if one is used. The maximum suggested project name is 64 characters. This suggestion is due to limitations within some code storage systems.

Location-
This is where the application will be stored on your hard drive. The default should work just fine, but I prefer to store my code just off of the drive in a Dev folder i.e. C:\Dev. By doing this I am able to keep all of my applications in one place programming language and development application. This also avoids issues with the max file path length of 260 characters.

Solution Name-
This holder is for the application. In Dev Location, after I create this solution, I will have a folder called HelloWorld which comes from the solution name. Changing this to something like HelloWorld2 can cause some weird things to come up like additional folders under the project's main folder.

This Checkbox-
This checkbox will cause the .sln to be placed with the project files. Using forces the Project name and Solution name to be the same. This is something that is a personal preference, but I prefer to keep my solution file outside of my project folder.
The reason that I prefer to keep my solution (.sln) file in the parent directory for all projects is that one solution could have multiple projects. So keeping that out in the parent directory, there will then be project folders as child objects on for each project in the solution.
Clicking Next will bring you to the Additional Information screen.
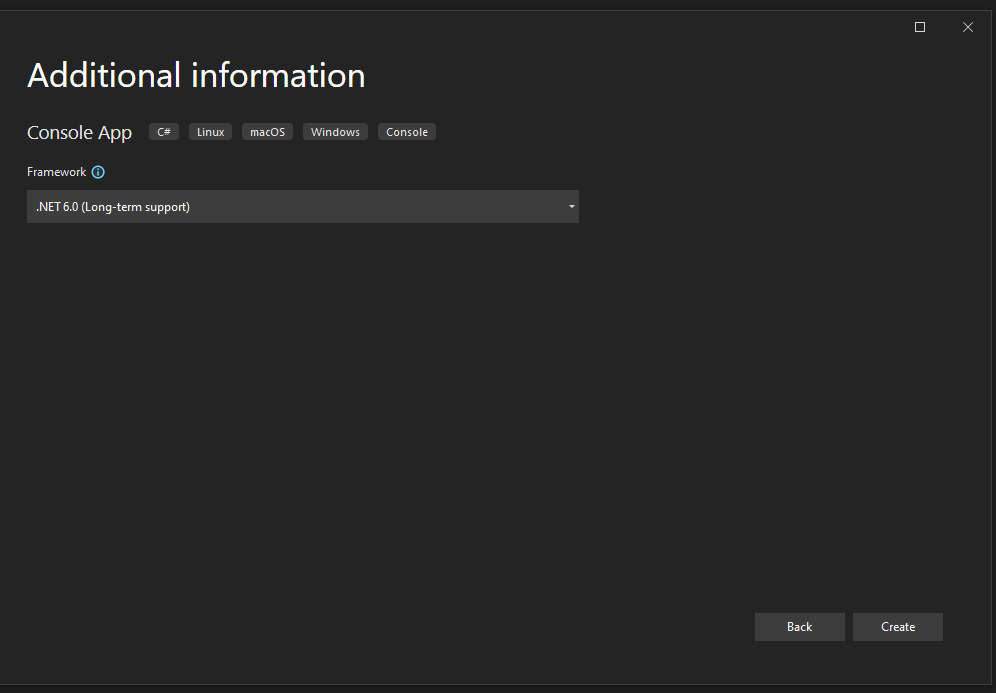
This screen will allow you to change the Framework of your project. Here we will use the .Net 6.0 framework. but any should work. There are some long-winded explanations of what .net is (here)(here)(here), but the basics of it are it takes the C# code that we write, and translates it to code that the application actually understands.
Click Create.

Your application will create the Program.cs file will open. This .cs file type means a C# file. The default template code will be in the file.
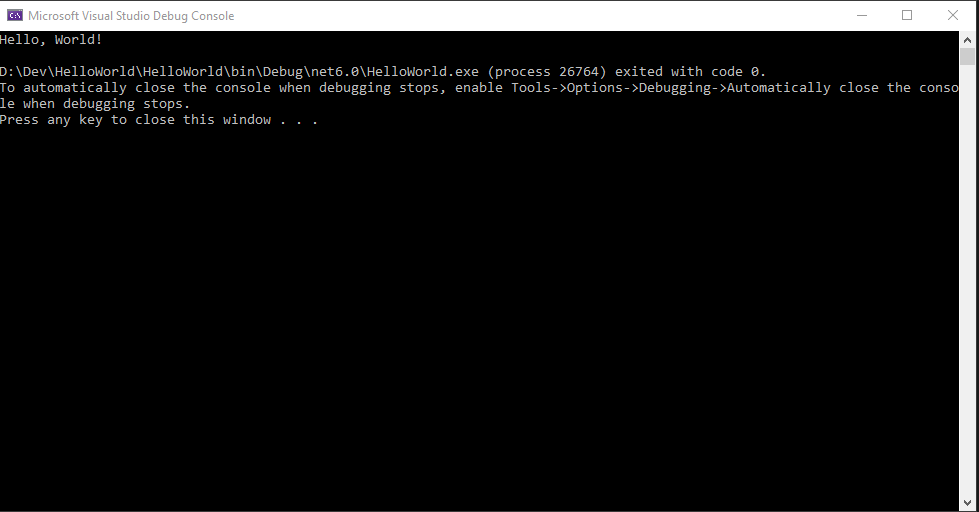
Running this application should pop up a console window. The first line of the window should say "Hello, World!" Under that will be some lines about the application is exiting. This is done so that the window does not automatically close before we read the message. Pressing space will close the console.
This application works, but it's not really using the format that any application takes. Let's delete all the lines in the Program.cs file and replace them with the lines below.
The application should run and look the same as it did with the previous lines of code.
Here is what each line of the code is doing:
namespace HelloWorld-
The namespace is used as a kind of location for finding code. This comes in handy when using code from other projects within a solution. Though the namespace is optional in a simple application like ours, it is a good idea to use one just to get into the habit.
There can be more than one namespace in a cs file, but this is not common, and from the code maintenance point of view when you have to determine what your code does, this is not a good practice. When I am looking through code, a second namespace within a file makes following the code much more difficult. As I work a part of my time on maintaining old code written years ago, readability is a major problem that some developers do not consider when writing code.
Namespaces can also be nested. This is common amongst some development, and not common amongst others. An example of nesting namespaces can be seen when you need to use prebuilt code using the "using statement". As an example "using System.Net.Mail;" would allow you to reference the items in the Mail namespace that exists in the Net namespace that exists in the System namespace. The design exists so that we can have a set of code in System.New.Mail named the same as a set of code in System.Net.HTTP.
{-
The brackets "{ }" are designed to determine what is in the previous command. This first bracket is the opening bracket determining what code belongs to the "namespace HelloWorld". The closing bracket } ends the section of code.
A common bug when developing is not closing brackets in the right location. If we look at our code we can see we have our namespace with it's bracket, a Class with another opening bracket, and then then a piece of code with another opening bracket. The last three lines of code are the closing brackets for these three opening brackets.
There is also a difference in coding style that comes up frequently for discussion. On our program, we have namespace HelloWorld and then on the next line down an opening bracket. Some developers add the opening bracket to the same like as the namespace so that it looks like "namespace HelloWorld {". This is a stylistic thing and I see code written both ways. From a maintenance and debugging standpoint adding the opening bracket to the next line helps to determine if all brackets have been closed out properly where they should.
public class Program-
class-
The second word of this line is class. A class is the basic object that is created in Object Oriented Programming. It is a structure that holds the code of the application. Though classes are optional in c# they are required in many other languages, and there is not a good reason for not including a class in the structure. If we are calling code from another .cs file, the class will be an important piece of code to do that.
public-
The first word we have is public. This is called an Access Modifier and is used to control what has access to specific parts of your application. The public access modifier is the least locked down as far as use is concerned. A public item can be used throughout the application, and this is generally not what is needed. We should only be exposing things to outside areas of code if they have a legitimate need to be called from outside.
Other types of access modifiers that can be used are private, protected, internal, protected internal, and private protected. The three most used are public, private, and internal. The internal modifier is the default that is used if there is not an access modifier used.
Of these three, internal is the next most open-access modifier. When something is set to internal, it can be accessed from within the same class, from a derived class in the same project, and from non-derived classes within the same assembly. The word derived means that we have a class called car that represents what a car is, we could have a derived class called Toyota that would derive all of the structure of a car but would contain specifics that make it a Toyota.
The third of the most used access modifiers is private. When something is set to private, it can only be accessed from within the same class. A majority of things should be set to private unless there is a specific need to not have it be private. This avoids code accidentally overwriting things in other classes, and keeps code from reading code that it should not have access to.
Program-
The third word in this is Program, and will by default match the name of the file which is Program.cs. In c# this does not need to match the filename, but there are not a lot of good reasons to change the class name. Generally, classes are named with a capital letter followed by lowercase letters. Unless the class name is a compound of two or more words such as MyProgram where the first letter of each word is capitalized.
{-
See above for an explanation. This line will be the opening of the Program classes code.
static void Main(string[] args)-
This line is what is known as a method. Specifically, the Main method is the entry point for the application when it launches. This is not required in the latest versions of C#, but There are specific requirements for implementing an application with no main method (here).
Classes can have zero or more methods. Methods are often used to store common sets of code for reuse. As an example, if for instance, I needed to print something to the console, and then wait for a specific key to be pressed, this needed to be done several times. To wait for a key to be pressed, there are several lines of code that need to be used. Rather than adding those likes to the application every time I need to wait for a key to be pressed, I can instead create a method called WaitForKeyPress. The method would contain the few lines of code that need to be run when the key is pressed. Then when I needed to wait for a key press, I would only need to call the method rather than adding the lines again in my code to wait for a key press.
Also, note here there is no access modifier. This means that the default of internal is used.
static-
The keyword static is something that is normally grazed over when first learning about programming. When the keyword static is used imagine an object is created. There is only one object, and there can only be one object. If we create a non-method though, by just not including the static keyword, we have to create the object before we can use the method that the class contains.
view rawNon-Static Class hosted with ❤ by GitHub
In the top example here our Class2 has a static method named MyMethod1 so we must create an instance of the object and access the method from that class that we created. If we create a second instance, we will then have two distinct objects that have printed the line to the console. In the below static example, we can reference our MyMethod1 without needing to create the instance. This is because there is only ever one MyMethod1 that will exist, so there is only ever one instance we are referring to.
A static class also has other limitations such as not supporting derived classes. This can make them less useful as they tend to break the idea of object-oriented programming. Static objects CAN save on memory, or they can be terrible for it. Static objects are loaded into memory when the application starts, whether they are currently being used or not. This means that if a static object is large in size, it will take up a large amount of memory even when not being used. The advantage of static objects on memory though, is that there is only ever one of them, taking up its memory but never having a second created to take up more memory.
A common error that comes up is when a static class attempts to call a non-static class without first creating an instance of it. With non-static classes, they don't exist in memory till they are created, so there is nothing in memory to reference till we create the class with a new className(). This is usually pointed out by the development environment such as Visual Studio.
void-
The word void here is the return type, meaning what is this method going to return. The void means that it is not returning anything. This could instead be an "int" meaning that it would return an integer value. Things like classes can values can be returned from a method. We would then have to include a "return someint;" at the end of the method. Not having a return will cause an error. a null can be returned by just using "return;" as long as the return type supports this.
Main-
The name of this method is Main. Though any method can be named Main it's best to treat it as a reserved keyword to avoid confusion. In the static code above we can see that I have named my methods like MyMethod1. It's best to be as descriptive as possible when naming methods. MyMethod1 would be better off named PrintHelloWorld to show what the method actually does.
( )-
These are required for a method and contain what is being input into the method. This could be a single object or multiple objects separated by commas.
string[] args-
This is an array of strings that we call give the name args to. A string is a line of text "This is a string". An array of strings is a grouping of these strings. Then using an array we can call specific things from the list use. args[0] for example would be the first string on the array of strings. We do need to be careful when calling items if we call args[1] when none exist we will receive an error that may crash our application. Currently, we are not passing an array of strings into the main method when our application starts so this array will be empty.
{-
See above for an explanation. This line will be the opening of the Main method code.
Console.WriteLine("Hello World!");-
This line prints the words "Hello World!" to a new line in the console window.
The console is the way that console applications input an output data for the application. Here we use the WriteLine method and pass in the string "Hello World!". Console has several ways to provide data the the user other than WriteLine. Another common method that is used is Write(string) which would not add a line break at the end of the string. Writing with Write(string) again would place the string directly next to the previous string. In Visual Studio Typing "Console." will bring up a list of methods that can be used.
Console.ReadKey();-
This line waits for a key to be pressed before proceeding. The ReadKey method of the console will return the key pressed. We could then do something based on what key is pressed by assigning the key to a ConsoleKeyInfo object. Here we are not using the output, simply asking the application to wait for an input.
This line is not really necessary when launching from Visual Studio, as it pauses for us after the application exits. But when we build the application later and run it from an exe it will not pause before the console closes.
}-
This is the closing character for the {. In this case, this is the closing of the Main method.
}-
This is the closing character for the {. In this case, this is the closing of the Program Class.
}-
This is the closing character for the {. In this case, this is the closing of the HelloWorld namespace.
Compiling the application-
Once we have run the program to see if our program works correctly, we want to compile the code into an exe application that can be used on other computers without having to compile to program each time.

First, let's determine if this is a final product that will go out to people. If it is ready for release we want to change this from Debug to Release. This will remove some of the debugging code that is not needed for a final optimized application. leaving this in debug mode when we build the code will result in a slower application. However, this would likely only be seen in larger applications. Let's switch it to release, not because it will have a noticeable impact, but because it's a good habit and not one I was taught in school, one that caused major issues in a production environment. Just remember to switch it back once we have built the application so that we can debug it again later.
Once this is done go to Build and then Build Solution.
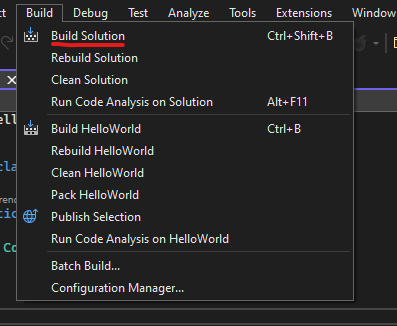
The Visual Studio application will start building. This should happen fairly quickly as it is a small application. The output window in Visual Studio should display the location to which the application build process outputs the build files. In my case:

The "bin" folder by default the drop-off location. Since we changed to a Release build, it is output to the Release Environment. net6.0 is the framework that we selected when we built the application. Going to this folder without adding the HelloWorld.dll to the end of the folder location will show the files that we need to run the application.

Double-clicking on the HelloWorld.exe will start the application by opening the console and displaying "Hello World!" it will also wait for us to press any key before closing.
I hope that you doing this helpful and informative, please leave a comment or feel free to send me an email Interfer0@gmail.com if you have any questions.
,